cropped-Favicon-512-32x32.png

5 Digital Artist Mistakes that Stop You From Improving

Not seeing improvements in your artwork, and not sure why?

So you bought some premium brushes from a certain famous digital artist with hopes that it would be a game changer for YOUR artwork…

… but not seeing stunning improvement? 😑

That’s OK.  I’m going to show you 5 of the most common digital art mistakes that I see from learners all the time.  I’ll also show you easy ways to fix them so you DO see satisfying improvements in your own skills.  I got you!

We’ll cover:

  • The secret to not overusing the soft round brush
  • How to use the smudge tool to blend in Photoshop
  • My absolute favorite color theory hack for artists: the L recipe
  • Why using the same brushes your favorite artists use doesn’t mean your art will look the same
  • What happens when you zoom in too much while you’re painting, and what you should be doing instead

These are quick fixes that you can implement today

When you’re ready to go beyond YouTube videos and follow a planned Learning Path that will really move you from beginner artist to advanced, check out the Digital Painting Academy. 👇

GROW FROM BEGINNER TO PRO IN 6 LEVELS

This success path is more than a course. It’s a learning journey to help digital artists like you paint from your imagination.

The post 5 Digital Artist Mistakes that Stop You From Improving appeared first on Paintable.

cropped-Favicon-512-32x32.png

How to Stylize Characters – In 3 Steps

Ready to dip your toe into character design?

Today’s tutorial is all about how to stylize a character based off of a reference photo, using 3 quick and easy steps. 

  1. first sketching the overall shapes
  2. then exaggerate the gesture
  3. and simplify the face. 


Want to draw big eyes to make your drawing cute? You can do all that, just make sure you keep the proportions of the face, so the character still looks human. This is the secret to the Disney art style too. And you can do it too! 

Watch the video and start stylizing your references today.

GROW FROM BEGINNER TO PRO IN 6 LEVELS

This success path is more than a course. It’s a learning journey to help digital artists like you paint from your imagination.

The post How to Stylize Characters – In 3 Steps appeared first on Paintable.

cropped-Favicon-512-32x32.png

How to Paint Clouds – 3 Easy Steps

Big, fluffy, sculptural cumulonimbus clouds can definitely add a mood to your artwork!  

Whether you’re doing cloud photo studies or adding clouds to landscape painting, I’ll show you the 3 easy steps that it takes to digitally paint your own fleecy puffs in ANY software.

  1. Sketching the basic shape and fill in with mid-values
  2. Illuminating the cloud form keeping in mind the direction of the light source
  3. Adding highlights and details with a texture brush

GROW FROM BEGINNER TO PRO IN 6 LEVELS

This success path is more than a course. It’s a learning journey to help digital artists like you paint from your imagination.

The post How to Paint Clouds – 3 Easy Steps appeared first on Paintable.

cropped-Favicon-512-32x32.png

Adding Details to Digital Art (Without Overdoing It)

There IS such a thing as overdoing it with the details in your digital art!

Many artists’ favorite part of the digital painting process is adding those fine details like eyelashes, skin, and hair texture to finish off the painting.

But generally, it’s a good idea to leave adding the details to your digital portraits as the very last step.

Why? Because when you start painting details early on it will be a lot harder to fix the fundamental mistakes in the anatomy of your drawing.

In this video, I’ll talk about why it’s super important to leave painting details at the end of your art process.

Plus I’ll give you tips on how to save time when painting patterns (great for backgrounds too). 

Here’s what you’ll learn in this video:

  • 0:00 The portrait painting method that I use and teach (because it works for so many digital artists!)
  • 0:53 When to apply details to your digital art
  • 1:59 Why is it a mistake to add details too early in the development of your portrait or illustration
  • 2:49 How to save time when adding details, so you don’t get too “in the weeds” and never actually finish
  • 4:02 A great tip for painting patterns fast and easily

GROW FROM BEGINNER TO PRO IN 6 LEVELS

This success path is more than a course. It’s a learning journey to help digital artists like you paint from your imagination.

The post Adding Details to Digital Art (Without Overdoing It) appeared first on Paintable.

cropped-Favicon-512-32x32.png

How to Paint a Skull in 3 Steps

Want to learn how to paint a skull in 3 simple, no-fuss steps?

Did you participate in our recent Paintable Discord challenge: Render a realistic-looking skull? 💀

After I finished and submitted my skull, I got some great questions from the participants around how I created it. So I recorded this speed painting to show you the 3 quick & simple steps I took:

  1. Sketch the skull using a reference image as a guide
  2. Bring in some volume by adding basic values and texture without getting into too much detail
  3. Add realistic depth and dimension to the skull with occlusion shadows
I go into each step in detail in the video. 👇

In the video, I also show you a great free online tool called Sketchfab that I use to find 3D renderings of objects I want to paint. (This is how I found a great angle of a skull I used for warm-up sketches in this tutorial.)

Want to hop into one of our upcoming free digital art challenges? I’d love for you to join us! Hop into the Paintable Discord community, then find the #paintable-challenges channel. 🙌

GROW FROM BEGINNER TO PRO IN 6 LEVELS

This success path is more than a course. It’s a learning journey to help digital artists like you paint from your imagination.

The post How to Paint a Skull in 3 Steps appeared first on Paintable.

cropped-Favicon-512-32x32.png

Easy Landscape Digital Painting Tutorial

Create a simple landscape digital painting, even if you’re just starting out!

Going on vacation, even if it’s a “staycation”, is a fun chance to take a break from portraits and paint the beautiful landscapes around you. 🌄

And to help you out, I have a brand new 4-min tutorial that shows you how to create your next landscape painting in 3 easy steps. This one is just right for beginners.


What you’ll learn:

  • The 3 steps I used to create the landscape above 👆 plus a second landscape
  • My shortcut for adding rich texture to any landscape fast
  • What to add to your landscape to wake it up with some pizzazz

When you’re ready to level-up from beginning digital artist to advanced fast, I invite you to check out the sequential Learning Paths in the Digital Painting Academy. 👇  You’ll learn everything you need to create beautiful landscapes, portraits, and fantasy illustrations, all in short step-by-step lessons!

GROW FROM BEGINNER TO PRO IN 6 LEVELS

This success path is more than a course. It’s a learning journey to help digital artists like you paint from your imagination.

The post Easy Landscape Digital Painting Tutorial appeared first on Paintable.

Texture_Brushes_Small_CTA_Text.png

How to Paint a Photo Study – in 20 mins

Want to learn how to paint a photo study quickly and easily?

Creating a series of quick photo studies over a number of days is a great (and fun!) way for digital art beginners to get better at painting fast!

The secret to creating photo studies from reference photos in 20 mins or less is to focus your attention on just 3 things:

  1. blocking the shapes
  2. adding texture with texture brushes
  3. capturing the gesture or motion within the reference

In this video, I’ll show you these 3 steps as I create a beachy flamingo scene for one of the Paintable Community Challenges:

This flamingo was painted for one of our free weekly art challenges in the Paintable Discord community.

Join us in the community to show off your art, get to know other digital artists like you, get (and give) feedback, and participate in new weekly art challenges! 

Also- you can download the free Paintable Texture Brush set that I use in this video right here (they come with tutorials on how to use them): 👇

The post How to Paint a Photo Study – in 20 mins appeared first on Paintable.

Texture_Brushes_Small_CTA_Text.png

How to Make Digital Paintings Look Traditional: 3 Pro Tips

Want a more traditional, “painterly” look to your digital paintings?

There’s nothing wrong with super-smooth blending and crisp, clean lines. In fact, some of my favorite pieces of digital art are in this style.

But maybe you love the look of a traditional painting or want to challenge yourself to create the illusion that you’ve used real brushes on a canvas.

Using texture is a great way to achieve that painterly feel in your artwork.

Creating texture doesn’t mean leaving random blocks of color or doing a final pass with a textured brush in an attempt to make your painting look more realistic.

So how do you make your digital painting look traditional using textures? That’s what today’s tutorial is all about!

In this video, you’ll learn my top 3 tips for mimicking traditional media. Watch step-by-step as I apply them to one of my portraits.

Here’s what you’ll discover:

  • A simple trick you can use before you start applying color to add authentic “imperfections” that give your painting a traditional vibe
  • How to choose the right brushes so that you create buildable texture and avoid that flat look
  • The “puzzle” approach to painting that adds realism and depth, and improves your observation skills!
  • The one tool you’ve probably been told to avoid that simulates real brushstrokes on a canvas — use this alongside a textured brush and your digital painting will instantly look more traditional

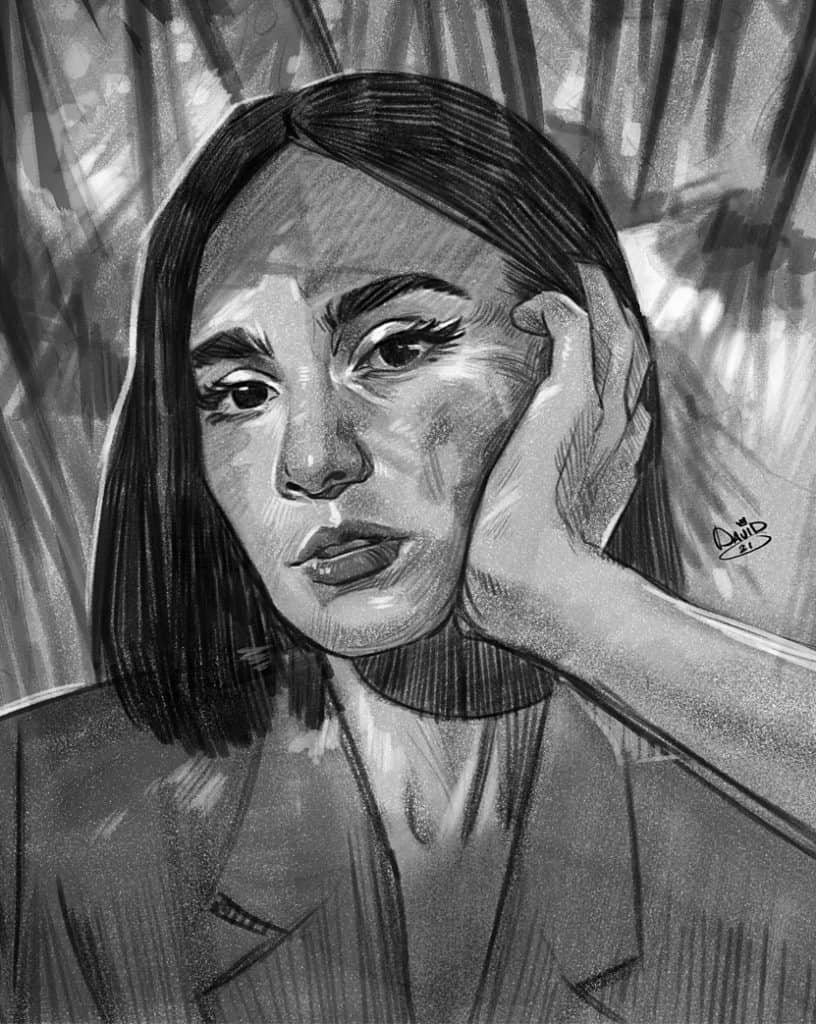
👉 Looking for more tutorials on how to paint beautifully textured portraits? Check out my video on using subtle yet striking style and texture to boost the realism of your digital portraits.

texture brushes for a traditional look & Feel + Free Tutorial

Free download:

Sure to become your go-to tools for perfect textures!

The post How to Make Digital Paintings Look Traditional: 3 Pro Tips appeared first on Paintable.

Sketching_Brushes_Small_CTA_Text.png

How to Draw a Digital Portrait Like a Pro: Sketching Tutorial

Ever spend hours figuring out how to draw a digital portrait, only to zoom out and realize something’s just “off”?

You’ve spent so long sketching, merging layers, and painstakingly adding in the details… only to discover that your portrait doesn’t resemble your reference — or even a person at all!

Even worse, it’s impossible to fix without losing hours of progress.

But all of this is avoidable.

How? By getting your sketch right!

In this tutorial, I show you my personal process to draw a digital portrait like a pro.

Here’s what you’ll discover:

  • How to build the perfect base layer to begin building your masterpiece, and avoid wasting hours on a portrait you won’t be satisfied with
  • The 3 classic sketching methods developed by world-class artists, and my own “Observation Measurement” method that blends all three… with a twist!
  • How to use a second sketch to nail all the details and bring your digital painting to life before you even start adding color
  • Why proportions are crucial even if you’re going for a “cute”, exaggerated, or stylized look

👉 For more tips on sketching, check out my video that walks you through 5 super-easy tips to level-up your drawings… even if you’re a beginner!

our best sketching Brushes + Free Tutorial

Free Download:

Craftsmanship at its finest!

The post How to Draw a Digital Portrait Like a Pro: Sketching Tutorial appeared first on Paintable.

cropped-Favicon-512-32x32.png

Painting Crystals And Gems – Digital Painting Walkthrough

“How do I get a translucent look when painting crystals and gems?”

Taking on the challenge of painting shiny, semi-transparent objects like crystals and gems, amber and sea glass is not for the faint of heart! 

Understanding how to get a realistic see-through lighting effect on objects can give your digital painting skills and entirely new dimension.

In this video, I’ll show you how I approach painting 2 glowing, faceted crystals that bounce reflected light off of each other. 

You’ll see some of the essential tools and techniques I use in my daily art processes, such as the pen tool, group masks, blur effects and more…

Tips to help you paint unique crystals:

  • Study the lighting on similar objects from a reference board
  • Draw multiple sketches to find a good design
  • Keep in mind the direction of the light source when painting the cuts (facets) on the crystal
  • Use texture brushes to add grains to the crystals and gems
  • Add small imperfections for a more realistic look

👉 If you need a more in-depth tutorial on lighting and shadows in general, check out this video on painting from imagination

Want to participate in free, fun digital art challenges like this one? 

Join me and thousands of other digital artists like you on the Paintable Discord server

New Challenges are happening all the time. See the “Challenges” section on the server, and jump right in!

Want the same set of brushes that I use in all of my paintings? You can download them here for free. 👇 

You’ll also get on the list to hear when I release my latest video tutorials and walkthroughs!

10 ‘MUST HAVE’ BRUSHES FOR PAINTING

Free Download:

Designed to Paint Incredible Portrait Details!

The post Painting Crystals And Gems – Digital Painting Walkthrough appeared first on Paintable.